


With every new release, the iPhone becomes an even more powerful photography device. The iPhone 16 Pro and iPhone 15 Pro models boast advanced camera systems. But even with all this power, great photos don’t just happen, understanding how to use your iPhone camera effectively is key to producing stunning, professional-quality images.
This guide walks you through step-by-step techniques, camera settings, and accessories that can take your iPhone photography to the next level.

1. Explore and Understand Your iPhone Camera Settings
Before jumping into shooting, it’s important to understand the tools available in your iPhone’s Camera app. Different camera modes are designed for different types of photography. Mastering them lets you capture each moment in the best way possible.
Step1: Open the Camera app.
Step 2: Swipe left or right on the mode carousel to explore:
Photo: Standard mode for most situations.
Portrait: Ideal for subjects with blurred backgrounds (bokeh effect).
Video / Cinematic: For shooting movies with depth and focus shift.
Pano: For wide landscapes or architecture.
Time-Lapse / Slow-Mo: To add motion creativity.
Step 3: Zoom using pinch gestures or tap optical zoom buttons (e.g., 0.5x, 1x, 3x).
Step 4: Switch cameras by tapping the rotate icon.
Step 5: For iPhone 16 users, press the shutter button on the side to launch the camera quickly.
Tip: Long-press any zoom level to activate manual zoom control via a ring dial.
2. Master Lighting
Lighting can make or break a photo, no matter how good your camera is. Below are the detailed steps o how to use or modify light to improve image quality and mood.
Step1: Use golden hour light (early morning or late afternoon) for soft, flattering tones.
Step2: Avoid harsh overhead sun, which creates strong shadows and blown-out highlights.
SIndoors: Position your subject near a window.
Step 3: Use clip-on LED lights or ring lights when indoors or at night.
Step 4: Disable flash by tapping the lightning icon and selecting Off.
Advanced: Swipe up in the Camera app and tap the exposure icon to manually adjust brightness before taking the photo.
3. Stabilize Your Shots for Maximum Sharpness
Even with optical stabilization, movement can blur your photos especially in low light. A stable shot ensures crisp details and better low-light results. Follow the detailed methods to achieve stability,
How to achieve stability:
-
Use a tripod or flat surface when possible
-
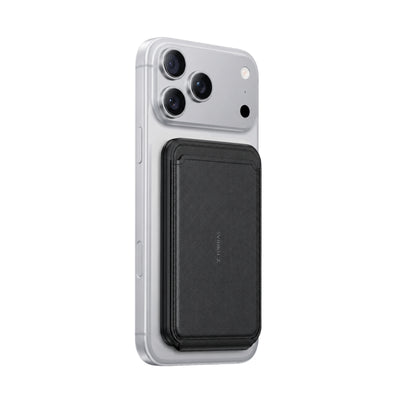
Alternatively, consider using a phone case with a built-in stand like the TORRAS Q3 Air phone case to quickly stabilize your phone for flat-lays, vlogs, or Night Mode shots.
-
For Night mode: Hold with both hands, tuck elbows, and remain still
-
Enable Volume Up as Shutter in Settings > Camera for less shake
-
On iPhone 16, use the dedicated shutter button for steady one-handed control

4. Use Gridlines and Composition Rules
Composition leads the viewer’s eye and adds emotion or symmetry to your photos. The iPhone’s grid can help apply these classic techniques.
Step 1: Go to Settings > Camera > Grid and turn it ON.
Step 2: Apply the Rule of Thirds: Position your subject at one of the intersecting points of the 3x3 grid.
Step 3: Try leading lines: Roads, fences, or shadows pointing toward your subject.
Step 4: Explore symmetry for architecture or reflections.
Step 5: Include foreground/background elements to add depth.
Tip: Don’t center every shot. Offset subjects often look more dynamic.
5. Edit Like a Pro With iPhone Apps
Editing helps refine color, contrast, and mood. Even small adjustments can turn a decent photo into an eye-catching masterpiece.
Step 1: Choose the Right App
Pick an app that suits your needs. Lightroom Mobile is ideal for precise color control, Snapseed is great for quick fixes and selective edits, and VSCO offers stylish filters for a polished look.
Step 2: Start with Basic Adjustments
Tweak brightness, contrast, and white balance to improve overall tone. Add sharpening for detail and reduce noise if needed especially for low-light shots.
Step 3: Keep It Subtle
Avoid over-editing. Aim for natural skin tones and realistic textures. You can also use the iPhone’s built-in editor (Photos > Edit) for simple cropping, straightening, and quick enhancements.
With just a few thoughtful edits, your iPhone photos will look more professional and ready to share.
6. Use the Right Accessories to Boost Image Quality
While the iPhone already delivers excellent image quality, the right accessories can unlock new possibilities offering better control, stability, and creative range. Here are a few essentials worth considering:
Clip-On Lenses
Expand your iPhone’s optical capabilities with attachable lenses from brands like Moment or Sandmarc. A macro lens lets you capture fine details up close, while an ultra-wide lens helps you include more of a scene.
Tripod for Stability
A flexible or magnetic tripod is perfect for long exposures, night shots, and time-lapses. It ensures stability in any environment and keeps your hands free while composing more complex shots.
Remote Shutter Control
Use your Apple Watch or a Bluetooth remote to trigger the shutter without touching the phone.
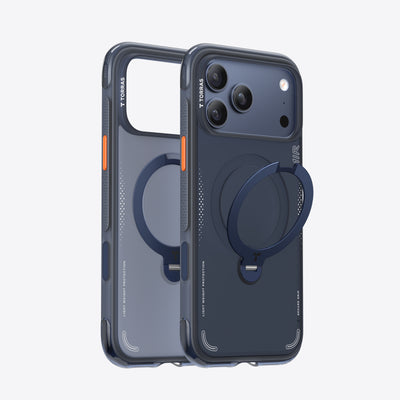
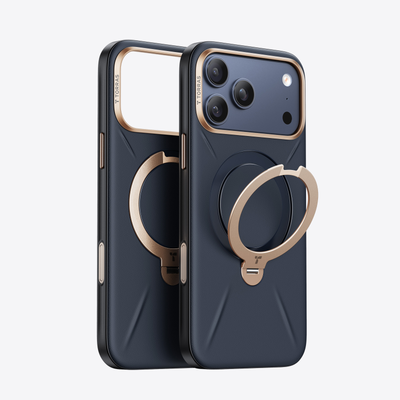
Multifunctional Phone Case
A truly ergonomic phone case should support both comfort and creativity. The TORRAS Ostand Q3 Air phone case is designed for users who shoot on the go. It features a 360° magnetic stand that doubles as a stable tripod substitute for flat lays, vlogs, or hands-free video. Its anti-slip lattice-textured surface ensures a firm grip, preventing drops while capturing that perfect angle.
With military-grade airbag protection and a slim 8-layer design, it balances durability and portability. Whether you’re filming, editing, or live-streaming, the Q3 Air keeps your phone steady, your hands relaxed, and your shots professional.
By using these tools, you not only improve the technical quality of your photos but also make your shooting experience more versatile and enjoyable.

7. Apply Scenario-Specific Techniques
Different settings require different approaches. Here are optimized techniques based on common use cases:
Portraits
Use Portrait mode to blur the background and highlight your subject. Adjust the f-stop (swipe up > tap “ƒ”) for more or less blur. Soft side lighting like from a window or LED to add flattering shadows.
Landscapes
Switch to the Ultra-Wide lens (0.5x) for a broader view. Use a tripod for stability, and tap to focus on a mid-point in the scene to keep both foreground and background sharp.
Night Photography
Night Mode turns on automatically in low light. Keep your phone still using a stand or timer. Tap the moon icon to manually adjust exposure time for better clarity.
Product / Flat Lays
Shoot from directly above with even lighting on both sides. Use a stand to hold your phone steady and avoid shadows.
8. Avoid These Common Mistakes
Even seasoned iPhone photographers can fall into these traps. Avoid them to consistently get better results.
A dirty lens is another silent culprit that can blur even the best compositions, so make a habit of wiping it clean with a microfiber cloth before shooting. Overusing the flash often leads to harsh, unnatural lighting; whenever possible, opt for natural or soft artificial light instead. Cropping too tightly while shooting is another misstep,leave some space in your frame to allow flexibility during editing.
Lastly, don’t forget to keep your iOS updated; Apple regularly enhances the camera software, and skipping updates means missing out on performance improvements and new features.
Conclusion
The photo quality taken by iPhone is decided by how well you understand and use what you already have. With the right lighting, thoughtful framing, steady hands, useful accessories, and some basic editing skills, you can instantly elevate your photography. Also, using practical tools like the TORRAS Ostand Q3 Air really helps to stabilize your shots and unlock greater creative control wherever you shoot.

 New
New


Becca Farsace
Emmy-winning filmmaker and creator Becca Farsace takes tech outside. A former senior video producer at The Verge, she has created and produced over 250 videos, becoming the first staffer to surpass 6.5 million views on TikTok. Now a full-time tech creator, she's built a go-to YouTube channel for adventurous, real-world tech reviews. Becca blends cinematic storytelling with a sharp strategic lens to help brands and audiences connect with technology in a more human, compelling way.